Showing posts with label plaster. Show all posts

Sunday, June 27, 2010

Day 187: Review of last week's work up to now!

So there hasn't been many updates during the week - we've been busy moving to a new housesit, plus the house has been locked up with the painters doing their initial preparation work. Plus I've been distracted with my new car - I had it serviced as soon as I bought it, and now it's giving me problems! Grrr....

Anyway, John called me Friday night to arrange a walkthrough Saturday afternoon, and we were able to be brough up to date on events. We also have a new CSC, I think this is our seventh?

Still waiting on the engineer's report on how to fix the laundry floor, that should come in sometime this week.

Anyway, here's the first round of pics from last week's work. The front and rear doors have had the first coat of stain put on, and they're starting to look good already!

Should get a little darker with the next coat of stain. Blends in well with the bricks outside, but from the inside there's a huge contrast with the white walls & ceiling, looks brilliant! John also pointed out where many of the windows have been damaged from bricklaying, so they'll all get fixed before handover.

Rear bipart doors also stained up nicely.

Over the dining room window, some of the cornice has been cutout as the ceiling is bowed. This will be fixed properly to the trusses, then new cornice over this area.


The kitchen has seen some attention too. Infills have been installed over the overhead cupboards, plus a few of the doors have been replaced - one or two were scratched, the ones under the sink were rubbing, and the one in the corner of the island has been replaced too - still needs a bit of adjustment as there's a very obvious uneven gap around it.

And our kitchen sink has arrived - a special order for us, as we couldn't find it in Studio M's standard sink range.

This is a Clark Razor double bowl undermount sink, normally a commercial installation but great for home use, as it's massive! Though not as deep as we though it would be, it's the widest/longest one we could find.

And to update our schedule, painting is meant to be done by end of next week (ie end of June). The electricians may be called in to pull through/expose all their wiring before the final coat of paint. Stone benchtops should be in on July 2nd, and tiling to start soon after!

Will post a few more pics tomorrow.

T&T

Thursday, June 17, 2010

Day 177: Deliveries continue, doors being painted?

More presents for the house arriving today...

Bit more plasterboard or cement sheets in the garage; probably for the garage roof, and maybe for the portico ceiling. Doesn't look like there's enough for both jobs though.

Some plumbing: the grey thing on the left is the box gutter for the balcony floor, not sure what the white planks next to it is.


Plus there's this plastic mushroom thingy that's grown very quickly outside the laundry door - some kind of drain cover?

Also the rumpus doors have been removed, maybe that means some proper door painting is going on somewhere? Couldn't get into the house today :(

T&T

Tuesday, June 15, 2010

Day 175: Plaster touching up

Some ongoing repair work being done - can't get on with more painting until all the plaster is ready to go!

The hole where the floor joist has been fixed is now plastered over.


Also, the final missing cornice has been put in over the fridge recess, also the hole where the cabling was pulled through has been repaired. Can see all the patchwork repairs in the alcove - lots more final sanding required before painting can go on.


And upstairs, the manhole (which was in the original but wrong spot) has been remove and plastered over. Hasn't yet been put in the right spot in Bed 4, but that shouldn't interrupt painting.


MyMetricon says painting should be done by 18.6.10, which is very unlikely - maybe another 2 weeks?

We took some friends through the house on the weekend... all they could say was - "it's a little big isn't it?" :) Which is a fair enough comment, and not said in a nasty way at all. But consider... you might build a 3 bed house, reasoning you'd never use that fourth bedroom, which would cost maybe $15,000 more in your new home contract. 3, 5 or 10 years after you move into your house and realise you could do with that extra room after all - but now it costs you $50,000 to add on as an extension? Or from another perspective, if you're building a house to live in, but keep an eye on the investment value of your house, that extra $15,000 bedroom may be worth $50,000 in the resale market a few years down the track. Don't forget, renovations/extensions are always more expensive (per sq m) than building it from scratch. Anyway, we're building this house to our needs and it suits our needs just right (I need that home theatre room! :) )

Anyway, just to get further sidetracked, I also was a bit naughty today - after selling my GTR, I was all convinced I'd manage without a project car for 6-12 months, but ended up buying a new toy this morning...


More pics on this fairly rare Audi next week after it's been re-registered! A lot slower than my GTR, but much better as a daily driver.

T&T

Tuesday, June 8, 2010

Day 168: Some further plastering/carpentry, and onsite meeting with our two SSs

This morning, the carpenters were in and added the missing noggin in the garage (only 1 required, not 2 because they're only for plaster fixing), as well as installing the balcony!


Plus some other carpenter type things were done, installing/closing gaps around the front door and internal access door with timber strips (that will be stained/painted to match). Now, if we only had a key for the balcony french doors (below), the waterproofers can go and waterproof the balcony so the tiling, guttering, and portico plastering can be done.

Also had a plasterer in today, installing the plaster under the top flight of the stairs and tidying up some other spots. He also repaired the two holes in the ceiling where the carpenters tried to find the damaged floor joist to repair... more on this later!


I guess the big things for today was our on-site meeting with Monique and our new SS John. MyMetricon was updated yesterday to say we were getting a new SS; because Monique is so busy with all the Balwyn builds, John will take care of us and our neighbour down the road (who just had the slab down for their Chelsea - congratulations guys!).

So anyway, we had a page of things that we were mainly concerned about and wanted clarification before any further work was done, and happy to say that we're satisfied with how things are being assessed and fixed.

1) Damaged floor joist: I pointed out to John that the damaged joist was directly under where the upstairs WC waste pipe was located. Since the carpenters had already tried twice (and failed!) to locate the joist from the ground floor, John got upstairs and banged through the plaster adjacent to the waste pipe, clearly marking out on the kitchen ceiling where the joist needs repairing. Should be an easy fix now!

2) Kitchen problems;
  • Kitchen stone bench on the side will go right into the window splashback reveal as per the earlier pic posted- carpenters will cut out all the wood/plaster that's blocking the benchtop.
  • Gaps, missing laminate strips - will all be fixed when the kitchen people come back in for the benchtops, or by the painters. Pretty minor but annoying stuff.
  • Rangehood: Will be externally ducted, will be dealt with later during the electrical final fixing.
  • Cables from the walk-in-linen - to be repaired by plasterer where they've been incorrectly pulled through in the fridge alcove.
3) Laundry waste: Been in the wrong spot for months, but the plumbing people responsible are aware it needs to be moved before tiling.

4) Garage internal access door: A replacement Balmoral-2 door has been ordered, as there was an estimating error somewhere - someone forgot to count all the doors correctly! And the missing noggins have been fixed this morning.

5) Rumpus room doors - Will leave them hanging the way they are, as they're set up for "right handed people" the way the right door opens. Not a big deal ultimately.

So, looks like things are geting back on track! John used to be a painter apparently, which should be a good thing, if it means he has an eye for detail!

The plans for the next few weeks:
  • Carpenters back in sometime this week to do the final fixes and repair that joist
  • Painters might start next week, and take around 2 weeks to complete internal painting
  • Tiling around the start of July
  • By August, final fixings, and maybe firming up on a handover date by that time too!
T&T

Thursday, June 3, 2010

Day 163: More plastering & site clean

Site clean was done during the day, and the plasterers came in until quite late in the evening to tidy up some plaster work in the kitchen.

The thing is, the window bottom edge is still at the wrong height, as the caesarstone benchtop is meant to go right in the window reveal to meet the window frame, as in this picture below.


The cabinet installers also left a note for the window to be moved as it was 15mm (at least!) too high for the stone benchtop, so we expect this to be rectified.

Also, the fridge alcove has had the corners plastered in, though no cornice above.


Tina will meet with our SS tomorrow after to see how fixing is going, and to pin down the schedule to fix the other minor things.

T&T

Wednesday, June 2, 2010

Day 162: Some plastering, and pre-paint assessment

Found that the plasterers had been in today, and installed the missing plaster in the kitchen.


However, the kitchen window still hasn't been moved, which will be an issue for when the ceasarstone benchtop arrives. It's meant to cover the side bench and into the window reveal, which at the moment is at least 15mm higher than it should be. Will bring it up with our SS this Friday.


In this pic, they've also plastered over the fridge alcove bulkhead. This is where our inspector picked up the bulkhead was in contact with the floor joists:

Item 11. The stiffening beams installed over the kitchen bulk heads are incontact with the floor joists which are therefore load bearing and are not end supported. As this bulkhead is not intended to be load bearing, there should be a clearance left between the floor joists and the bulk head.

So has this has been fixed? Who knows??!! *sigh* another item to bring up with the SS. Also where that bunch of cables are poking out through the wall - they're not meant to be there!!

For me though, the main item from our inspectors' report still to be fixed is Item 12. The sewer waste pipe over the kitchen area has been installed through the top flange of the smart joist. The manufacturers of the ‘Smart Joist’ do not allow cutting out of the top flange as noted on their ‘SmartJoist’ hole chart. Recommend the manufacturers supply a rectification design for the damaged floor joist. This item is still not fixed, and I want it fixed before any painting starts - mainly because this is a fairly serious structural problem. Come on guys, it's not that hard to fix! Find the upstairs toilet, and mend the damaged floor joist underneath it, rather than randomly cutting holes in the ceiling hoping to magically stumble across where it needs to be fixed.

And someone else has been through the house with a pencil, circling hundreds of tiny little dents and scratches to be fixed up and smoothed over before painting starts.


Nice to know some small faults are being identified, but as I keep harping about, it's our inspectors items, in particular the structural fauls with the house, that we want fixed before any further work is done. We haven't received a fixing invoice yet, but I want to know how our inspector's items are going to be fixed before payment is made - only reasonable when you're spending a few hundred thousand on a house, that you want faults fixed!

T&T

Monday, May 31, 2010

Day 160: Doors & skirting installed, fixing inspection items

Carpenters on the job today, with almost all the internal doors hung.

First of all, our front door has been installed- a Corinthian 6G in 1020mm wide. Will be stained dark, with a 750mm pull handle and mortice lock.

Next up; home theatre doors. I actually wanted the doors hung opposite to how they are in this pic: if you look closely, the right door has the opening handle, and the left door has the mushroom stop.

I did mention to our SS that I wanted the doors hung the other way - admittedly on the floorplan, they're drawn to this specification. I wonder if it can still be fixed - would involve moving the mushroom stop to the right side door, taking out the handle mechanism from the right side door (and filling in the gaps), and putting it on the left side door.

Upstairs now, this shows the upstairs linen closet. For some reason we had to choose totally different handles for linen doors (we chose rectangular handles that match the vanity handles) as you can't put the door handles you use on normal doors. No big deal I guess. Can also see the architrave & skirting all around too.

The other thing too is that the internal access door is a plain flush door, but we specified at our colour appointment that all doors are to be Balmoral-2 design - we think someone at M head office counted the number of doors wrong! Will contact our SS to see if the missing door is going to turn up soon.

In addition to doors & skirting, a couple of the inspection items are starting to be fixed, yay!


Above, Item 17. The noggin in the wall of the kitchen, below the stair case, has been removed. A small square of plaster has been cut out, and the noggin replaced. Should be pretty easy for the plasterers to seal it back up. In addition, all the data cabling etc is poking out on the left side of the pic - this pic shows the fridge alcove, and the data cabling should be on the other side of this wall in the walk-in-linen. Easy enough to plaster over though.

Another item has been attempted to be fixed...


12. The sewer waste pipe over the kitchen area has been installed through the top flange of the smart joist. The manufacturers of the ‘Smart Joist’ do not allow cutting out of the top flange as noted on their ‘SmartJoist’ hole chart. Recommend the manufacturers supply a rectification design for the damaged floor joist.

Looks like the carpenters aren't exactly sure where this sewer waste pipe defect is, so this cutout in the ceiling is in the wrong spot. To make it easy for the carpenters to find the spot, they should go to the upstairs WC and poke a long drill bit directly adjacent the the waste pipe, and where it pokes through the ceiling is where they need to fix the defect - but I don't want to tell anyone how to do their job, so maybe we'll just sit tight and see how they go about fixing things! Ultimately the ceiling and kitchen needs to be replastered as most of the defects are in this area so the end result will be good - we hope!

T&T

Wednesday, May 26, 2010

Day 155: Garage roof done, and more work in the wet rooms

Turned up at 7pm and astonished to find someone still on site!

Anyway, we're thinking that the tilers came in the morning to finish off the garage roof - finally no more rain and mud in our garage area! Been keenly anticipating this part of the roof being done, as there's not much more to do for the facade to be complete.


However there's a couple of little things that need fixing in the garage roof - I think the rear gutter is incomplete, and there's a couple of noggins missing from the truss in the pic below. Easy to fix providing it's done before the plaster goes up!!!


The people who stayed back to dinnertime were working in the wet areas, just finishing off some cabinetry work.

In the ensuite (above pic), handles have been installed, basins placed in rough position (won't be sealed in until ceasarstone delivered) and a big backing board for the wall mirror mounted. Because of the little drawers in the ensuite vanity, the handles here are smaller than used in the other vanities; but still looks good.

And in the bathroom, handles, basin and mirror backing board installed. Still no more items from our inspection fixed yet.

T&T

Sunday, May 23, 2010

Day 152: Kitchen and vanities installed on a Sunday - Good, and Bad!

After a little sleep in, thought we might go past our house today, and weren't we surprised to find some people working hard to install our cabinets - on a Sunday of all days!

At this point, I think it's important to mention that while we like to have a lot of work being done on our house, recently it seems that speed is overtaking quality control - mainly concerning the laundry and the kitchen. We'll get to those 2 things later, but let's have a look at the vanities which are being installed without too many issues - so far.

First of all - the powder room vanity. This has polar white cabinets, and will have Urban (grey) Ceasarstone drop benchtop with a semi-recessed Liano basin. So far, no problem.

The vanity sits on a little pedestal which will be tiled, as well as tiled skirtings.

The pic above is of the bathroom vanity, no handles yet. Again, polar white cabinets, Urban ceasarstone benchtop.


And this one is the ensuite vanity, double doors under each sink and a stack of 3 drawers in between the sinks. OK so far. Same colours as before.

Now here is where things start to go wrong... anyway, this next pic is the kitchen - looks good in this angle! New Graphite on the island bench, and Pearl Frost (or is it Frosty White?) on the cupboards.

The next pic is a closeup of the island bench. One door is missing - apparently was scratched, so a new one ordered. The other issue is that the two doors under the sink cutout - the handles rub on the surrounds, so they'll need fixing.

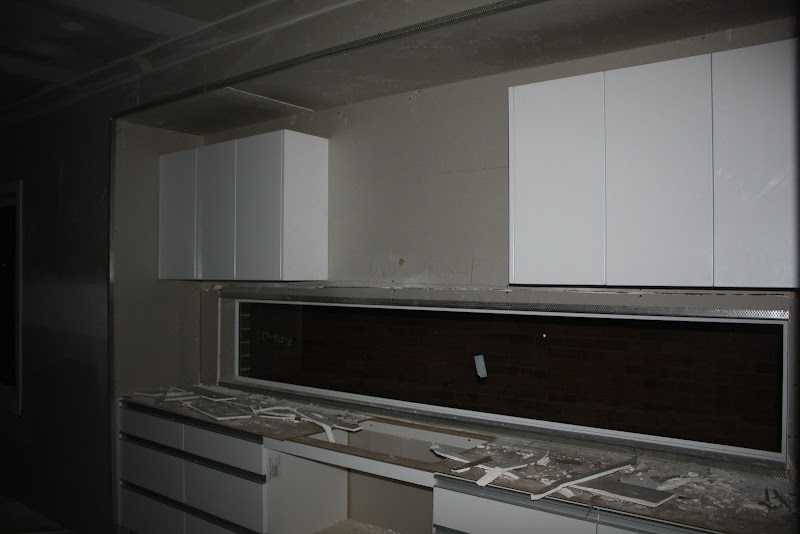
But the real problems are all to do with the side bench. Have a look at the next photo.

See the exposed plywood on the side wall? It was left unplastered so it could be fixed at the top. Same with the missing plaster on the bulkhead. However, you'd think the cabinet installers would realise the plaster is yet to be completed, but no... they've plowed on anyway and stuck on the side bench and overhead cupboards, with a few random bits of plaster against the plywood. In addition, the kitchen window is 15mm too high, which means the stone benchtop won't fit right - it's meant to reach right into the window reveal.

So what needs to be done here? The overhead cupboards and bench need to be removed so that plaster can be correctly installed on the side and bulkheads, fixing screws plastered over and sanded. There's no way for an acceptable plaster fix to be done with the cupboards and bench in the way, I don't think! And the window needs to be corrected - a job for the carpenters. Then the kitchen can be re-installed.. *sigh* wouldn't it have been easier if the installers hadn't been organised until things had been fixed first?

However, apart from these issues regarding the order of fixing, we do like the colours and how they've come together - in particular, the flush handles we picked are very streamlined, and don't stick out of the drawers so you don't end up bruising your leg against them while working in the kitchen!

And here's issue number two. Laundry bench is Polar White, with New Graphite benhtop. We added in a floor waste to the laundry to be positioned under the washing machine position, and this is clearly marked on our plans. But the floor waste pipe was put right next to the laundry sink waste pipe. This issue was mentioned several times, months ago (I think March at least!) and also picked up by our independent inspector - but despite this, the floor waste still hasn't been moved. And what does this mean now? The laundry cabinets have been installed, the installers have cut out TWO holes in the base of the cupboard - one for the laundry waste, and one for the floor waste (the one on the left of this pic), which isn't meant to be there. *sigh*... so what has to be fixed now? The laundry bench has to be taken off, floor waste position corrected and termite protection around the pipe reinstalled, the base of this bench needs to be replaced and then reinstalled.

Now if only the kitchen and laundry had been left until this looooong outstanding issues had been fixed, it would make like much easier for all the tradies involved, instead of a problem being identified, ignored while work steamrolls blindly forward, then everything ripped apart, fixed, and then started again. One very quick step forwards and three long steps back. *sigh*...

We're hoping work will still continue at its rapid pace, and we're loving how our house is starting to look, but it'd be nice to have these niggling little issues resolved prior to ongoing work being done. Still many other items from our independent inspection to be rectified in the frame - again, which has been plastered over. Be nice to get an update on progress too - haven't had a call from our SS in a couple of weeks?

T&T

Monday, May 17, 2010

Day 146: Sanding

Bunch of trades in the house today with full protective gear, sanding down all the walls. Hopefully this means not long until cabinets and other fun things arrive!

T&T

Saturday, May 15, 2010

Day 144: Plasterers working on a saturday - cornices installed

Thought we'd stop by the house after lunch today, nothing much has happened the last couple of days but apparently the plasterers were in this morning, as the cornices have been installed.

Hopefully the writing will be scrubbed off, or at least fully hidden by painting! This is a closeup of a weird little recess near the entry door.


Standing in family room looking at kitchen. There's still some frame issues to rectify before plaster is installed over the fridge recess & along the side. You can see the horizontal kitchen window splashback, which will have cupboards above & below there. To the right of that is the door to the pantry, then the huge fridge recess. Because we moved the laundry door from the kitchen, the fridge recess is now big enough for 3 fridges! One for food, one for wine, one for beer...

And this is why we still don't have tiling on the garage roof - we're missing a truss right here. The roof protection is on, the tiles & pointing are delivered, so I guess as soon as the truss can be delivered, the carpenters should stick it up, then the tiling can get started. Sooner the better too - with all the rain lately, there's a few inches of mud coating the garage floor!

Hoping to see some action with stairs in this coming week too!

T&T

Tuesday, May 11, 2010

Day 140: Plastering, Day 2! Plus a bonus... walkthrough video!

After receiving the report from Alex last night, decided to give Monique a call in the morning. She hadn't received the report, so I emailed it to her and Julie, our construction CSC, as well as a request for the bracing diagram - which to Metricon's credit, we received a few hours later.

Anyway, we're pretty happy at how Monique says she'll handle the issues raised; some of the plaster has been left off where changes need to be done, and where the toilet plumbing cuts through a truss, the carpenters will cut out plaster and repair, get a few photos taken then replaster. Sounds good to us!

So here's a few photos from Day 2 of plastering - pretty much all complete (except cornices), and the joins in the plaster and screwholes have mostly been plastered over.

Many people have reported their houses feel bigger after plastering; we're not in agreement with that! The open plan area (kitchen, living and dining) definitely feels bigger after plastering - it brings out the 2.7m ceilings well, and we're looknig forward to spending many lazy evenings here! But the minor bedrooms do feel a little smaller after plaster, but then again it was getting late in the afternoon with not much light, so we'll see how it feels in broad daylight.

Home theatre room, south facing window looking out the the backyard on the left, then another window facing west, but shaded by the outdoor room on the right. These are double glazed awning windows (which are standard in the rumpus room only), so hopefully with the home theatre cranked up, there won't be too much sound leakage to annoy the neighbours! There's also sound insulation (acoustitherm) to all walls in the home theatre room. We were thinking of doing double glazed to all windows, but think we'll put them few extra thousands towards the mortgage first.

Upstairs. On the left is Bed 4, then a linen cupboard. Then an open doorway in the centre, with the toilet just to the right of it. Then another open doorway to Bed 3, and Bed 2 around the right corner.

Apparently, our beautiful (and expensive!) upgraded stairs might be in as soon as next week - and the kitchen is soon on the way! Hopefully the issues raised at inspection will be corrected prior to much other work is done too. So far Monique's been great at scheduling tradies, and we're hoping she's good at getting them back in to correct things too!

Now the countdown is really on towards finishing... took us months to get to a site start with all issues with easements and powerlines, but it's almost like the end is in sight!

And finally - because we've managed to hit the magic mark of 50 followers (if you want updates on our blogs and you're not a "follower", click on the follow button on the right column to get updates!)... I recorded a little video on Tina's ipod nano of a walkthrough, until the nano ran out of space. Enjoy!


T&T

Monday, May 10, 2010

Day 139: Plaster installed on INSPECTION DAY... The good, and the bad!

Well, today was the day we had booked in our independent inspector to have a lockup/preplaster inspection - and of course, the best-laid plans are laid to waste by plasterers who decided to start on our house EARLY - thus our "preplaster inspection" is more of a "mid-plaster inspection". I missed a call from Alex (our inspector) this morning - turns out he arrived at our house early, and he started his inspection early because he found the plasterers already sticking up the ceiling and walls!

I didn't make it to the inspection due to work, but Tina met Monique and Alex on site to have a look around. Anyway, let's start with the plaster pics first.

Kitchen/family room area.

Kitchen window splashback, surrounded (mostly) by plaster. Long cornices sitting on the floor.

Dining room with plaster waiting to be installed, home theatre room off to the left.


Bathroom - not "normal" plaster used here, special wet-area sheeting used.

Anyway, back to the inspection. To be honest, quite annoyed at the plaster going up ahead of schedule, as we were very clear that we wanted the inspection done prior to any plaster being put up so that the frame could be inspected as well. However, the plasterers (being third party subcontractors) seem to do what they feel like, and what can we do about that?

Alex picked up on 18 items on his inspection, some easy to fix and trivial, some a little more involved. Anyway, let's do a brief assessment and my layperson's assessment of the seriousness of each.

1) Garage internal access door - gap between the bricks and frame. Easy - timber infill or similar to fix.

2) Some bricks on the garage slab stained from brick cleaners acid. Easy - just need recleaning.

3) Garage boundary brickwork substantially overhanging slab. Medium-Hard - need an engineer to design a rectification solution to support the brickwork.

4) Holes in mortar around the house. Easy -just needs new mortar added.

5) Perpends in alfresco piers over tolerance.
Easy (apparently.) Tina says it's a minor cosmetic issue.

6) Timber quads to be installed around afresco beams.
Easy -again, a cosmetic issue.

7) Timber infill needed over alfresco door/window.
Easy.

8) Powder room window damaged along top edge.
Easy (apparently), Monique will get that fixed.

9)
Render splatters on brickwork to be cleaned. Easy.

10) Brickwork short of entry frame. Medium - needs door frame adjustment, or infill to match doorframe.

11) Kitchen bulkheads (not load bearing) are in contact with floor joists, need to have a clearance between these two.
Medium-Hard -not sure how this can be fixed?

12) Sewer waste pipe (from upstairs toilet) cuts through top of Smart Joist truss - not allowed. Hard? I googled the manufacturers data, and apparently they need a photo and description of the damage to the joist so they can say what needs to be done to fix it. A similar situation was seen with the ensuite shower waste cutting through the joist, and a new beam was fixed adjacent to that, so I suspect a similar fix is needed.

13) Heating ducts are installed through a number of joists, with the holes beyond the maximum size allowed for these joists. Hard? Maybe needs reinforcement of joists where the holes have been cut. Alex only noticed the heating ducts in the family room, but there are a number of other heating ducts through the ground floor which have also been cut through joists, and would need similar rectification. (Of course, to fix all these things the ceiling will have to be pulled off, the rectifications done, and ceiling replastered. Not our fault the plasterers started early!)

14) Tension bracing not adequately fixed to top & bottom plates. Easy - Hard? Monique reckons they're to manufacturers spec, so we'll see what the documentation says.

15) Ply brace in kitchen not nailed in. Easy - just nail in some more nails!

16) Lintels missing over openings in non load-bearing walls (doorways, robes etc). Medium - Hard. Because the plastering is mostly done upstairs, the plaster needs to be removed, lintels installed and replastered. See why the plasterers shouldn't have been booked until the result of our independent inspection?

17) Noggin missing in kitchen wall. Medium. Remove plaster, add noggin, replaster. Sigh... would've been easier... if the plaster wasn't put up early! Spot a trend here?

18) Floor waste to laundry in wrong spot. Medium. Move floor waste, get engineer to approve modification to slab and termite protection is intact. Alex recommends viewing proof all this has been done (eg engineer's report) which is a good idea.

Things weren't all bad though - Alex did state that the brickwork was done to a very high standard, which we're both extremely happy with!

Soooooo... things were going too well I guess to not have some hiccups! On the whole, about half the things Alex picked up were minor and easily fixed. However, the remainder are slightly more complicated, and would be MUCH easier to fix, if the plaster hadn't been installed.

However, the outcome of having this inspection done is that we're going to follow up on the items identified, and ensure that things are made good to standards. I doubt there's ever been a house built that was constructed 110% correct from the outset, and providing that these items are corrected to the relevant standards, we'll be happy still! I reckon there'll be a significant amount of plaster removal and replacement - however that's not our problem!

So, finally a plug for Alex at urbaninspectreport.com.au for doing a thorough job. Stay tuned for followup regarding what happens next. I'll be emailing Alex's report to our construction CSC (I'm not sure who that is this week, it seems to change every month) and will call Monique tomorrow morning to ensure she has a copy of the report, and find out her plans for rectification. Plastering (except cornices) is 99% complete (in one day!) but there's not much point doing any further work until these items are rectified to our satisfaction.

Wish us luck everyone!

T&T

LinkWithin

Related Posts with Thumbnails