Tuesday, January 24, 2012

DIY Deck Part 6: All done (bar the staining!)

So here's the result of our summer project;


Deck after a rinse and a bit of a scrub. Getting conflicting opinions on whether to clean the deck now and stain, or wait 6 months then clean and stain. If only the deck was this clean and shiny all the time!


Installing deck lights - if I was more prepared, I would've ordered these from eBay and saved 40%, but since I needed to wire in the transformer and run cables under the deck, had to buy them from the Big B at full retail *gasp*. There's 6 lights pointing upwards and 4 pointing out towards the "garden" at the back.

A dusk shot. The LED lights are surprisingly bright, once the backyard is properly finished, it'll look great! Now have to decide what to do with all the weeds and rubble littering the backyard - maybe paving around the deck? Lawn/turf? More mulch? More decking?

T&T

Tuesday, January 17, 2012

DIY Deck Part 5: 99.5% completed

As of this morning, the deck is pretty much complete now!

In the near corner there's one short board I'll take to the father-in-laws place to be ripped down to 60mm to fit. I could've done the deck with no ripping, but it would mean larger spaces between the boards, and I wasn't keen on 6-7mm gaps! 


On this side, I haven't put in the trim board yet (the vertical piece that hides the joist ends) because I've got a set of LED deck lights that I need to install in the last decking board first. Need a pretty big spade bit (about 35mm) or a small holesaw to get the cuts done.


So I have a newfound respect for all trades now after working on this deck for two weeks solid! Back, arms and hands a little sore. Getting everything square, level, and with consistent gaps is much harder than I'd thought.

We also went down to Laminated Timber Supplies in Croydon yesterday to check out a stain called Cutek CD50. Been reading up a bit on stains, and it seems there's either water or oil based stains, and oil based stains are "generally better" for my liking, as they're easily recoated and don't peel, unlike some water/acrylic based stains. Anyway, spoke to the sales manager David there who was extremely helpful, stained some of my decking offcuts to see what they'd look like and gave us a couple of sample pots. The price is more than the stains in Bunnings etc, but seeing as we've already spent plenty of time & money getting the deck done, it doesn't seem smart to try and save $50 on a stain that can make or break the deck! Will decide on a stain in the next few weeks, anyway. Definitely Cutek is high on the shortlist, mainly because of the service provided so far by David and the good feedback given amongst DIY forums.

And for those who're interested, just to recap on costs - we were quoted $7000 from a tradesman to build our deck (without stainless screws, without deck lights, without picture border!) and I think I've spent maybe $2300 on all materials (including a mitre saw, and a thousand leftover stainless screws). So if you have the inclination - and the time - doing your own deck can be quite satisfying and cost-effective!

Upcoming projects - make a small laundry step (using leftover decking), maybe a letterbox, and confirm the new supplier of our soft closing door dampers version 2.0!

T&T

Tuesday, January 10, 2012

DIY Deck Part 4: Decking starting to be installed

So after a frustrating couple of weeks waiting on one ebay seller to get back to me, turns out the delay is all due to Toll IPEC receiving my item and then deciding to lose it for a week. They still haven't found it. Ironically their marketing slogan is "Toll Ipec - If It's Urgent", which should then be followed by "...don't use us, because we'll lose your items and not let you know about it". Pretty impressive for a courier company to fail so hard at their job, so in future I'll be making sure to avoid using them whenever possible.

Anyway, had an excellent experience with Better Hardware. I placed an order Sunday night with a note I needed these screws urgently - I got a call Monday morning from their sales manager who offered to meet me in Melbourne and hand them over to me! I said the next day would be fine, and he couriered them to me which I received Tuesday morning today! Rare to get such great personalised service, highly recommended. So if you need any decking supplies, email Tim at BetterHardware directly and say you saw this recommendation on Tim&Tina's blog and he'll look after you!

 So here's what I received from Better Hardware - 1000 stainless steel screws, 10Gx50mm long. Two square driver bits, and a Smart-Bit for countersinking.


I also made a jig out of some leftover aluminium fastener plate - basically I wanted to screw each board down one at a time and make sure all the screws lined up correctly. I staggered the screw joins too to try and minimise any crack formation in the joists.

So, long story short - lots of measuring, re-measuring and re-re-measuring, I manage to line up the first decking board and the first two picture frame boards, and lay a few more decking boards down before my cordless drill battery had enough.

I do love the mitred edge on the picture boards! A bit of a hassle to setup and get 100% right, but looks mint! The Smart-Bit is highly recommended, a massive timesaver and gets the countersinking depth perfect each time. Hoping to get all the decking down in the next 4-5 days!

T&T

Saturday, January 7, 2012

DIY Deck Part 3: Joists 70% done

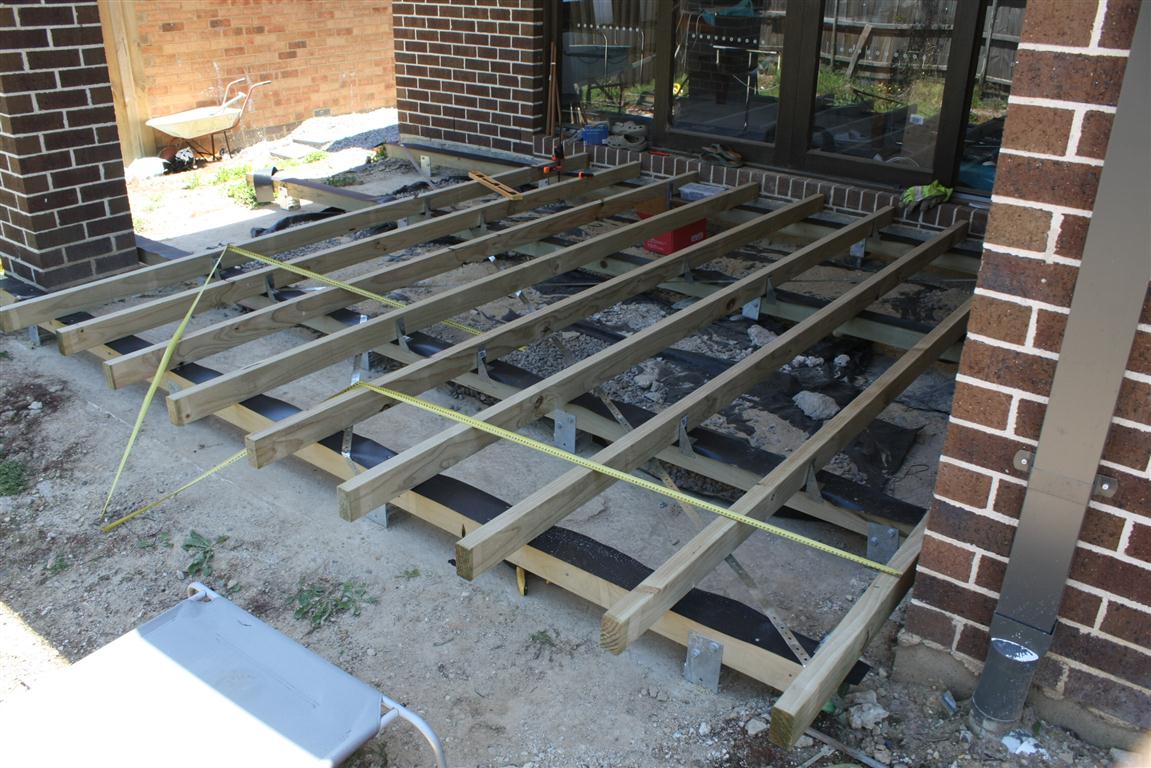
After the hard work getting the bearers in, the joists (so far) have gone in pretty quick.


Put down some weedmat first, and a bit of sand/rock to hold it in place. Also set in some crossbracing (probably redundant with all the joists being fixed in, but whatever) and the joists are held in with triplegrips at 400mm centres. 


Got the first 10 or so joists fixed in, and will get the rest done probably tomorrow - need to trim them to fit in around the brick pier first.


And then more internal framing to do so the picture border can go in.

Pretty annoyed with how one dodgy ebay seller is holding up progress though.

*EDIT* Turnes out the delay was due to the courier company managing to lose a parcel in the 10km between the seller and myself. Even so, if a seller isn't going to be working for a certain period, they shouldn't be advertising items for sale if they're not going to post them for a week. *


T&T

Thursday, January 5, 2012

DIY Deck Part 2: Bearers all in

So I finished installing all the bearers yesterday - mixing concrete is hard work!


So these are the 4 bearers that will support the deck. 3 are long, with 5 stirrups supporting each, and one is shorter with 4 stirrups.
 

8 of the supports are concreted in place. The black strip is an idea picked up from some DIY forums - basically it's dampcourse material, same used to stop damp moving up your walls. When it rains, it'll stop the water pooling on top of the bearers and joists, hopefully prolonging the lifespan of the deck. There's a proprietary product called Protect-A-Deck which costs a fortune, or by using dampcourse, it's $13 to do the whole deck and then some leftover.

This is one of the things I like about DIY - you can take as much time as you want to research how things are done - and you realise just how likely it is for a contractor to skip things because you (the customer) don't know any better. Would a contractor use this kind of protective strip? Probably not. Will your contractor use sealer/preservative over the cut ends of treated pine bearers/joists? Maybe, if you're lucky. Will your contractor calculate the exact spacing of your joists so they're even, or will they simply slap joists down at 450mm centres and have an uneven one leftover? Will they even use the correct nails, joist hangers, unities/triplegrips? Unfortunately if you don't know what questions to ask and what specifications to check on, you'll probably get something less than the bare minimum. I certainly don't pretend to know everything about decking, but it does take time to read up on best practices, if you can find the time.

I'ev been getting ready for the next stage of the project by making sure all some of the hand-me-down tools I've scrounged are clean, sharp and ready to go - new blades for the circular saw, removing rust from the set square, various OCD things like that!

Tomorrow - I'll be putting on some crossbracing across the bearers, placing weedmat and rock, and installing the joists.

T&T

LinkWithin

Related Posts with Thumbnails